Tableau gives users a number of ways to change the formatting of dates. The method used will depend on the context of the date format change. For example, there is the capability to change the default date format which will impact how date formats are applied to all visuals, the ability to adjust the date formatting for each visual individually, or you can create a custom calculated column to convert a date into a string with custom formatting. The date formatting method will vary based on the use case and multiple methods can be used throughout a Tableau report.
Table of Contents
Changing a Default Date Format in Tableau
To change the default format of a date column in Tableau, you can right click on the field name within the Tables column of Tableau Desktop. Then select Default Properties > Date Format. The Default Date Format dialogue box will appear where you can select a preset date format or define a custom format.
The Date format option is available under Default Properties > Date Format.
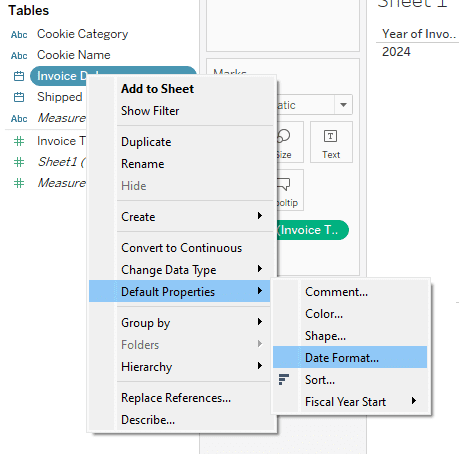
The Default Date Format dialog box appears for that date field. you can select a preset or scroll to the bottom of the page and choose a custom format.

After pressing OK the default format will be updated. Any time a date is added to a visual this will become the format across all report pages.
Tableau provides a list of supported functions when creating your own which can be a useful reference for determining the required custom formatting syntax for your needs: Custom Date Formats – Tableau
Changing a Date Format for a Single Visual in Tableau
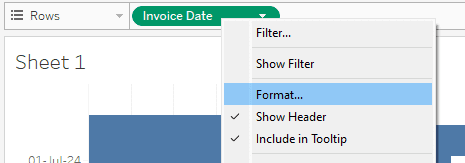
To change the date format for a single visual in Tableau, assign the desired date pill to the column or row shelf to setup your visual as desired. Then right-click on the assigned field and select Format. The Format Date panel will appear on the left side of Tableau where you can update the date format parameters.
Right-click on an assigned date field. Then select “Format…”
A panel appears on the left side of Tableau that allows you to adjust formatting options for that field which are specific to the visual the field is assigned to. Click on the “Dates” dropdown to adjust how the date is presented. Additional options exist to change the font, alignment, and color.
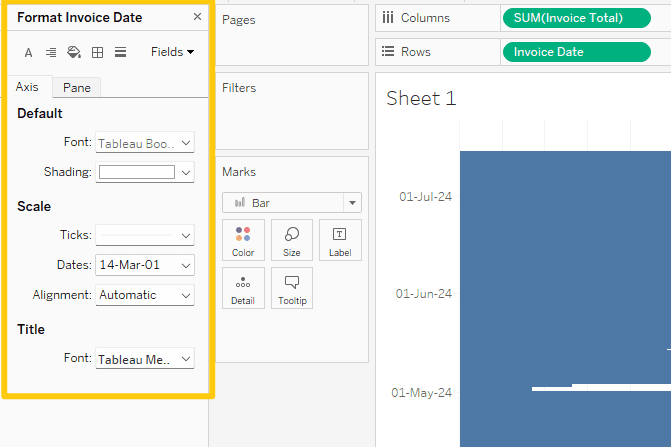
When using this method, the formatting changes are only applied to the visual being edited.
Custom Date Formatting in Tableau
How to Change Date Formats within a Calculated Field
The DATENAME function can be used in Tableau to extract portions of a date field and convert them to strings. The formula can extract month, day or year. Then combined with the concatenate function you can create custom date formats within a calculated field by piecing the components back together in the needed format.
Here’s an example of how to use a DATENAME function along with concatenate to create a string value of a date within a calculated field.
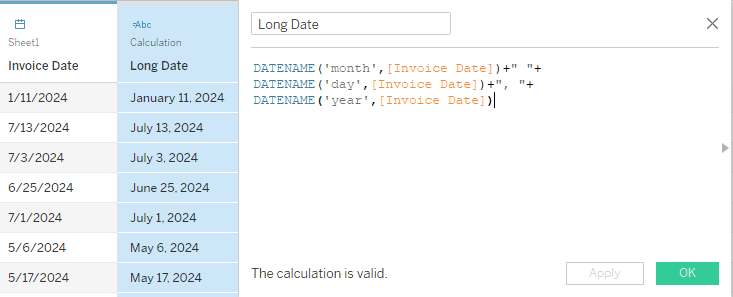
DATENAME('month',[Invoice Date])+" "+
DATENAME('day',[Invoice Date])+", "+
DATENAME('year',[Invoice Date])
The DATENAME formula uses the syntax: DATENAME(‘date_part’,[Column Name]) which can then be concatenated using the + symbol and custom text surrounded by quotes for spaces and commas between date sections.
The results of the formula are a date in the format of January 11, 2024 as a new calculated column within the Tableau data set.
For other date formats you can use different sets of formulas with the same methodology. First convert a date into the section of date formatting needed. Then concatenate the pieces together for the desired output.